.NET CORE 3.1 提供了 worker service 这么一个模板,可以方便开发者来创建”windows 服务程序“(同样可发布于 linux)。本篇以 centos 7.6 为发布环境,简要说明如何使用 worker service 来创建服务,并部署发布到 centos 中。
你可以通过以下命令来查看本地安装的 .net core 环境:
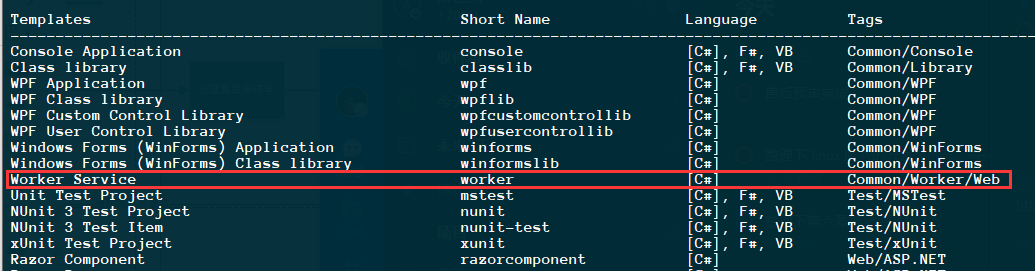
你可以通过以下命令来查看是否含有 worker service 模板:
安装
方式1:命令行形式安装
你可以通过如下命令在当前解决方案中安装:
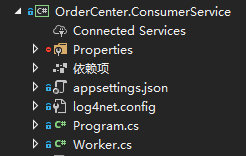
这里以项目:”OrderCenter.ConsumerService“ 为例
1
2
3
4
5
6
cd 解决方案路径dotnet new worker -o OrderCenter.ConsumerService dotnet sln OrderCenter.sln add ./OrderCenter.ConsumerService.csproj
创建的项目如下:
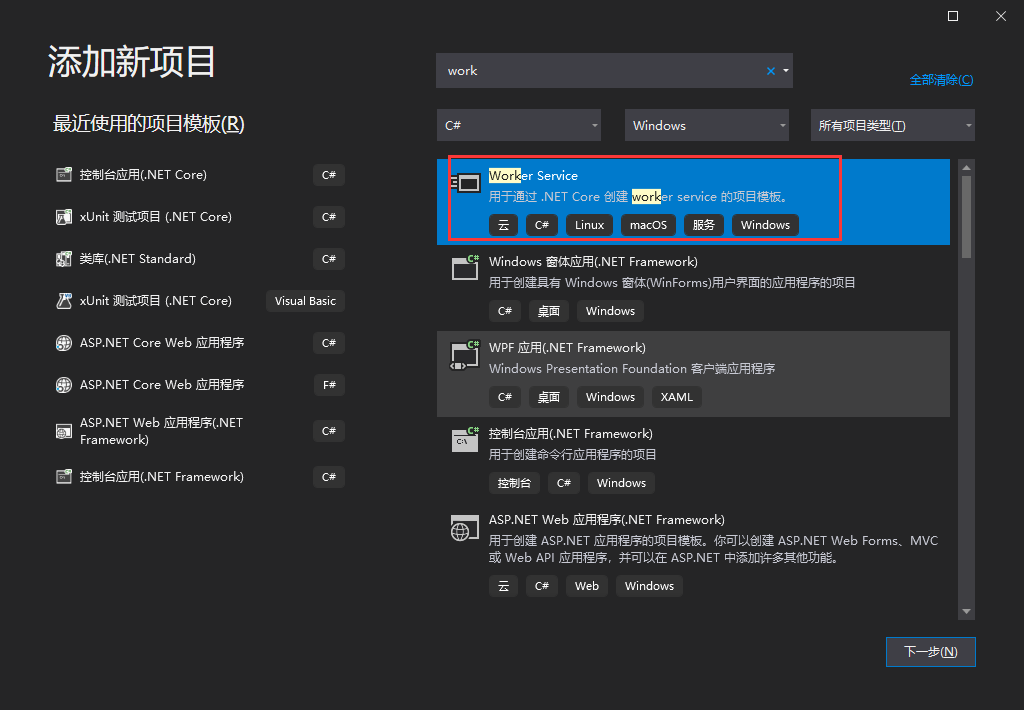
方式2:UI界面
如果你不习惯使用命令行来创建项目,可以直接通过 UI 界面来添加项目:
配置
worker service 默认支持 IOC,你可以直接使用,同时你也可以直接配置日志等信息,示例如下:
本博文涉及的引用包及版本如下:
你可以在 Program.cs 中进行配置,代码如下:
1
2
3
4
5
6
7
8
9
10
11
12
13
14
15
16
17
18
19
20
21
22
23
24
25
26
27
28
29
30
31
32
33
34
35
36
37
38
39
40
public static IHostBuilder CreateHostBuilder (string [] args Host.CreateDefaultBuilder(args) .UseContentRoot(Directory.GetCurrentDirectory()) .ConfigureAppConfiguration((hostingContext, config) => { config .AddJsonFile("appsettings.json" , true , true ) .AddJsonFile($"appsettings.{Environment.GetEnvironmentVariable("DOTNET_ENVIRONMENT" )} .json" , true , true ) .AddCommandLine(args); }) .ConfigureLogging(config => { config.SetMinimumLevel(LogLevel.Trace); if (Environment.OSVersion.Platform == PlatformID.Unix) { config.AddLog4Net("log4net.linux.config" ); } else { config.AddLog4Net(); } }) .ConfigureServices((hostContext, services) => { #region >> 服务发现 #endregion #region >> 初始化数据库 #endregion #region >> IOC services.AddApplicationService(); services.AddDomainService(); services.AddRepository(); #endregion services.AddHostedService<Worker>(); }).UseSystemd();
你可以在 Worker.cs 中编写业务代码,示例如下:
本文以 MQ 消费者为例:
1
2
3
4
5
6
7
8
9
10
11
12
13
14
15
16
17
18
19
20
21
22
23
24
25
26
27
28
public class Worker : BackgroundService { private readonly IRabbitMqDomainService _mqClient; public Worker (IRabbitMqDomainService mqClient ) { _mqClient = mqClient; _mqClient.Initialize(); } protected override async Task ExecuteAsync (CancellationToken stoppingToken ) { _mqClient.SubscribeAutoAuditOrder(); _mqClient.SubscribeGenerateDeliverSheet(); while (!stoppingToken.IsCancellationRequested) { LogHelper<Worker>.LogInformation("服务还活着。" , "ExecuteAsync" ); await Task.Delay(600000 , stoppingToken); } } public override Task StopAsync (CancellationToken cancellationToken ) { LogHelper<Worker>.LogInformation("服务停止。" , "StopAsync" ); return base .StopAsync(cancellationToken); } }
生成发布文件
通过命令生成
通过以下命令可以生成发布文件,
1
2
3
4
5
6
cd 发布项目路径dotnet publish -c release -r linux-x64 -f netcoreapp3.1 dotnet publish -c release -r win81-x64 -f netcoreapp3.1
通过 UI 生成
发布
发布到 linux 中
将对应的发布文件上传到服务器中
假设上传到的目录为:
假设服务的运行程序为:/usr/bp/myservice/OrderCenter.ConsumerService.dll
自启动设置
这里介绍 3 种让服务开机自启动的方式,当然你也可以用 PM2 之类的进程守护程序来进行。
1.通过 crontab 来设置开机运行
1
2
3
4
crontab -e @reboot /usr/bp/myservice/OrderCenter.ConsumerService.dll
2.通过在 rc.local 文件夹设置开机运行
1
2
3
4
vi /etc/rc.d/rc.local /usr/bp/myservice/OrderCenter.ConsumerService.dll
3.通过 systemd 进行开机启动
创建 service 文件
1
2
3
4
5
6
7
8
9
10
11
12
13
14
15
16
17
18
19
20
21
22
23
cd /etc/systemd/systerm/vim myservice.service [Unit] Description=work service demo [Service] WorkingDirectory=/usr/bp/myservice ExecStart=/bin/dotnet /usr/bp/myservice/OrderCenter.ConsumerService.dll Restart=always RestartSec=10 KillSignal=SIGINT SyslogIdentifier=your-service-name User=root Environment=ASPNETCORE_ENVIRONMENT=Development Environment=DOTNET_PRINT_TELEMETRY_MESSAGE=false [Install] WantedBy=multi-user.target
设置自启动
1 systemctl enable myservice
启动服务
1 systemctl start myservice
发布到 windows 环境中
如果要发布到 windows 服务种,则需要安装 Microsoft.Extensions.Hosting.WindowsServices.dll (替换上面的 Microsoft.Extensions.Hosting.Systemd)
同时修改 Program.cs 代码
1
2
3
4
5
6
7
8
9
10
11
12
13
14
15
public static IHostBuilder CreateHostBuilder (string [] args Host.CreateDefaultBuilder(args) .UseContentRoot(Directory.GetCurrentDirectory()) .ConfigureAppConfiguration((hostingContext, config) => { config .AddJsonFile("appsettings.json" , true , true ) .AddJsonFile($"appsettings.{Environment.GetEnvironmentVariable("DOTNET_ENVIRONMENT" )} .json" , true , true ) .AddCommandLine(args); }) .ConfigureLogging(config => { services.AddHostedService<Worker>(); }).UseWindowsService();
通过 sc.exe 命令行工具来创建服务,命令如下:
1 2 3 4 5 6 7 8 9 10 11 12 13 14 15 sc.exe create YOURSERVICENAME binPath= X:\OrderCenter.ConsumerService.exe sc.exe start YOURSERVICENAME sc.exe query YOURSERVICENAME sc.exe stop YOURSERVICENAME sc.exe delete YOURSERVICENAME
参考: