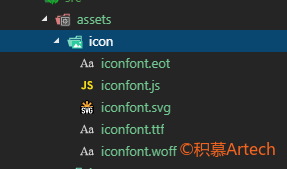
项目初始化:
使用 create-react-app 创建项目
1
| create-react-app kede.mobile
|
删除多余的文件:
如:
创建开发所需文件夹
在src文件夹中创建 components 文件夹,所有的组件均建立在该文件夹下
styled-components:react中的CSS最佳实践

styled-components:
- 核心理念:移除样式与组件之间的对应关系
- css in js,写的是真CSS,非类似于 CSS 的 JS 对象
- 拥有 sass,less 的优点
官网地址:https://www.styled-components.com/
使用 styled-components 全局注入 normalize.css
安装 styled-components:
1
| npm install --save styled-components@3.4.9
|
创建 src/style.js文件
使用 {injectGlobal} from 'styled-components’进行全局样式的注入推荐使用 normalize.css?v=7.0.0 版本
normalize.css:https://github.com/necolas/normalize.css
1
2
3
4
5
| /style.js
import {injectGlobal} from 'styled-components';
injectGlobal`
/*normalize.css*/
`
|
在 src/index.js 中引入上面的style.js
网站body样式:
/style.js
1
2
3
4
5
6
7
8
9
| export const Wrapper = styled.div`
max-width: 750px;
min-width: 320px;
margin: 0 auto;
padding-top: 0;
overflow: hidden;
position: relative;
padding-bottom: 80px;
`
|
/index.js
1
2
3
4
5
6
7
8
9
10
| import {
Wrapper
} from './style.js';
const container = (
<Wrapper>
<App />
</Wrapper>
)
ReactDOM.render(container, document.getElementById('root'));
|
header 组件布局
路径:src/components/header
新增文件:
/components/header/style.js
1
2
3
4
5
6
7
8
9
10
11
12
13
14
15
16
17
18
19
20
21
22
23
24
25
26
27
28
29
30
31
32
33
34
35
36
37
38
39
40
41
42
43
44
45
46
47
48
49
50
51
52
53
54
55
56
57
58
59
60
61
62
63
64
65
66
67
68
69
70
71
72
73
74
75
76
77
78
| import styled from 'styled-components';
import searchIcon from '../../assets/img/icon_head.png';
export const HeaderWrapper = styled.div`
width: 100%;
max-width: 750px;
min-width: 320px;
height: 45px;
z-index: 11;
top: 0;
position: fixed;
`
export const Mask = styled.div`
width: 100%;
height: 45px;
position: absolute;
background: #141414;
opacity: .8;
top: 0;
left: 0;
z-index: 0;
`
export const ClassMenuLink = styled.a`
position: absolute;
top: 50%;
left: 10px;
width: 31px;
margin-top: -16px;
display: block;
`
export const ClassMenuImg = styled.img.attrs({
src: "https://pic.keede.com//app/images/Community/Index/classmenu.png"
})`
width: 31px;
vertical-align: middle;
border: none;
`
export const SearchBar = styled.div`
background-size: 21px auto;
background-position: 12px -47px;
background-color: #fff;
background-repeat: no-repeat;
width: 60%;
height: 27px;
margin: 9px auto;
padding: 0 24px 0 42px;
position: relative;
border-radius: 15px;
&.head_icon {
background-image: url(${searchIcon});
}
&.hd_search{
background-size: 21px auto;
background-position: 12px -47px;
background-color: #ffffff;
background-repeat: no-repeat;
width: 60%;
height: 27px;
margin: 9px auto;
padding: 0 24px 0 42px;
position: relative;
border-radius: 15px;
}
`
export const SearchInput = styled.input.attrs({
placeholder: "库博硅水凝胶日抛"
})`
display: inline;
height: 27px;
line-height: initial;
width: 100%;
border: none;
background: none;
font-size: 14px;
outline:none;
`
|
/components/header/index.js
1
2
3
4
5
6
7
8
9
10
11
12
13
14
15
16
17
18
19
20
21
22
23
24
| import React, { PureComponent } from 'react'
import {
HeaderWrapper,
Mask,
ClassMenuLink,
ClassMenuImg,
SearchBar,
SearchInput
} from './style';
class Header extends PureComponent {
render() {
return (<HeaderWrapper>
<Mask></Mask>
<ClassMenuLink>
<ClassMenuImg></ClassMenuImg>
</ClassMenuLink>
<SearchBar className="head_icon hd_search">
<SearchInput></SearchInput>
</SearchBar>
</HeaderWrapper>);
}
}
export default Header;
|
footer组件布局
路径:src/components/footer
新增文件:
/components/footer/style.js
1
2
3
4
5
6
7
8
9
10
11
12
13
14
15
16
17
18
19
20
21
22
23
24
25
26
27
28
29
30
31
32
33
34
35
36
37
38
39
40
41
42
43
44
45
46
47
48
49
50
51
52
53
54
55
56
57
58
59
60
61
62
63
64
65
66
67
68
69
70
71
72
73
74
75
76
77
78
79
80
81
82
83
84
85
86
87
88
89
90
| import styled from 'styled-components';
import footerIcon from '../../assets/img/footer_nav.png'
export const FooterWrapper = styled.div`
background: #ffffff;
border-top: 1px solid #ccc;
height: 55px;
position: fixed;
bottom: 0;
max-width: 750px;
min-width: 320px;
width: 100%;
font-size: 0;
z-index: 11;
transform: translateX(-50%);
left: 50%;
`
export const ItemContainer = styled.ul`
margin: 0;
padding: 0;
border: 0;
outline: 0;
font-size: 100%;
vertical-align: baseline;
background: transparent;
-webkit-text-size-adjust: none;
-webkit-font-smoothing: antialiased;
-webkit-tap-highlight-color: rgba(0,0,0,0);
`
export const Item = styled.li`
width: 25%;
display: inline-block;
position: relative;
float: left;
/* 元素内部元素上的样式 */
.link_duwu::after{
background-position: 0 -100px;
}
`
export const ItemLink = styled.a`
display: block;
width: 100%;
height: 100%;
text-align: center;
position: relative;
vertical-align: text-bottom;
font-size: 14px;
padding: 31px 0 3px;
text-decoration: none;
cursor: pointer;
color: #888;
-webkit-tap-highlight-color: rgba(255,255,255,0);
&::after{
content: "";
background: url(${footerIcon});
background-size: 20px auto;
width: 20px;
height: 20px;
display: block;
position: absolute;
top: 6px;
left: 50%;
margin-left: -10px;
}
&.link_home::after{
background-position: 0 0px;
}
&.link_cart::after{
background-position: 0 -120px;
}
&.link_mine::after{
background-position: 0 -140px;
}
`
export const CartQuantity = styled.i`
background: #ff7c7c;
font-size: 10px;
padding: 0 5px;
border-radius: 8px;
position: absolute;
top: 5px;
left: 50%;
margin-left: 4px;
font-style: normal;
color: #fff;
`
|
/components/footer/index.js
1
2
3
4
5
6
7
8
9
10
11
12
13
14
15
16
17
18
19
20
21
22
23
24
25
26
27
28
29
30
31
32
33
| import React, { PureComponent } from 'react'
import {
FooterWrapper,
ItemContainer,
Item,
ItemLink,
CartQuantity
} from './style';
class Footer extends PureComponent {
render() {
return (
<FooterWrapper>
<ItemContainer>
<Item>
<ItemLink className="link_home">首页</ItemLink>
</Item>
<Item>
<ItemLink className="link_duwu">毒物</ItemLink>
</Item>
<Item>
<ItemLink className="link_cart">购物车</ItemLink>
<CartQuantity>0</CartQuantity>
</Item>
<Item>
<ItemLink className="link_mine">我的</ItemLink>
</Item>
</ItemContainer>
</FooterWrapper>
);
}
}
export default Footer;
|
-
从 iconfont.cn 中下载需要的图标到本地(红框中的为项目中需要使用到的文件)
-
嵌入 react 项目中
-
修改文件后缀: iconfont.css -> iconfont.js
-
修改 iconfont.js 中内容,使用 styled-components
-
使用unicode
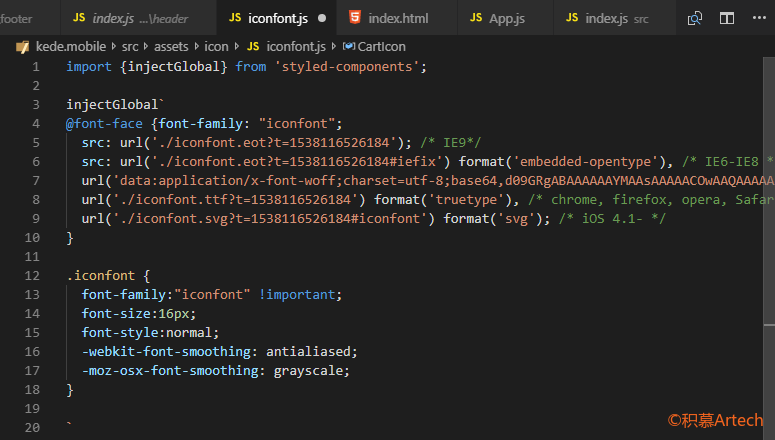
组件中使用:
1
2
| 导入:import from './assets/icon/iconfont.js'
使用:<i class="iconfont">& #xe67c;</i> //中间空格去掉
|
-
使用fontClass
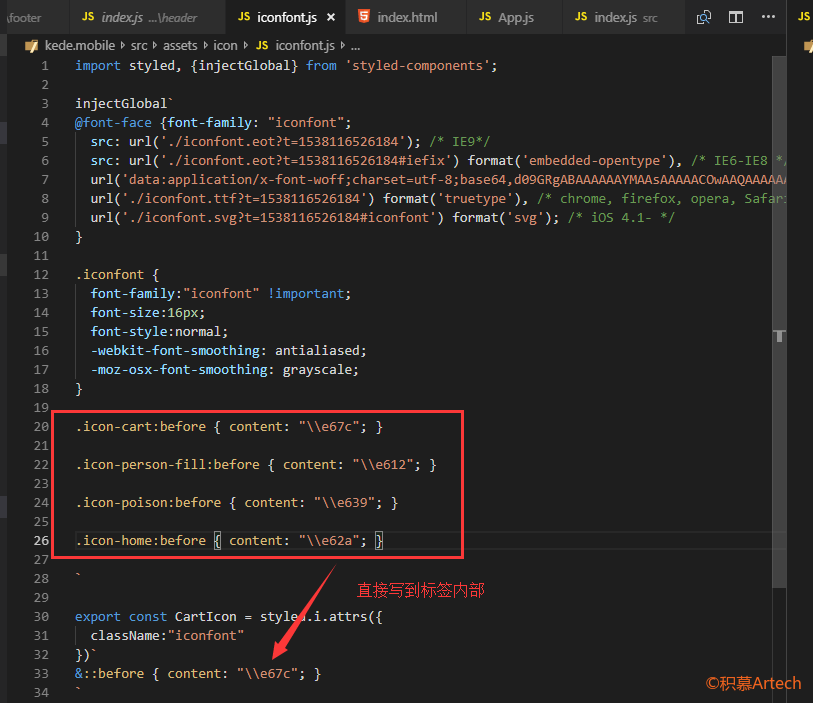
组件中使用:
1
2
| 导入:import{CartIcon} from './assets/icon/iconfont.js'
使用:<CartIcon></CartIcon>
|
使用 react-router-dom 进行页面路由
文档:https://reacttraining.com/react-router/web/guides/basic-components
安装:
1
| npm install --save react-router-dom
|
使用:
App.js
1
2
3
4
5
6
7
8
9
10
11
12
13
14
15
16
17
18
19
20
21
22
| import { BrowserRouter, Route } from 'react-router-dom';
class App extends Component {
render() {
return (
<div className="App">
<BrowserRouter>
<Fragment>
<Header></Header>
<Route path="/" exact component={Index}></Route>
<Route path="/Duwu" exact component={Duwu}></Route>
<Route path="/Cart" exact component={Cart}></Route>
<Route path="/Mine" exact component={Mine}></Route>
<Route path="/Detail" exact component={Detail}></Route>
<Footer />
</Fragment>
</BrowserRouter>
</div>
);
}
}
|
需要注意,Fragment标签需要有一个根节点
Route所用与的属性:path,exact,render,component等。
在styled-components中,使用Link模块
/components/footer/style.js
1
2
3
4
5
6
| import {Link} from 'react-router-dom';
export const ItemLink = styled(Link).attrs({
to:props=>props.to
})`
/*其他样式*/
`
|
页面使用:
通过 <Link>标签进行路由跳转
Link所用到的属性:to。
这里使用在 styled-components声明的标签 ItemLink (此时即为Link)
1
| <ItemLink className="link_cart" to="/cart">购物车</ItemLink>
|
标签切换时的当前状态变化
首页内容渲染
涉及知识点:
封装的axios(beta)
1
2
3
4
5
6
7
8
9
10
11
12
13
14
15
16
17
18
19
20
21
22
23
24
25
26
27
28
29
30
31
32
33
34
35
36
37
38
39
40
41
42
43
44
45
46
47
48
49
50
51
52
53
54
55
56
57
58
59
60
61
62
63
64
65
66
67
68
69
70
71
72
73
74
75
76
77
78
79
80
81
82
83
84
85
86
87
88
89
90
| import qs from 'qs'
import axios from 'axios'
axios.interceptors.request.use(config => {
return config
}, error => {
return Promise.reject(error)
})
axios.interceptors.response.use(response => {
return response
}, error => {
return Promise.resolve(error)
})
function checkStatus (response) {
if (response && ((response.status === 200 || response.status === 304 || response.status === 400))) {
return response.data
}
return {
code: '404',
message: '网络异常'
}
}
export default {
post (url, data) {
return axios({
method: 'post',
baseURL: process.env.BASE_URL,
url: url,
data: qs.stringify(data),
headers: {
'X-Requested-With': 'XMLHttpRequest',
'Content-Type': 'application/x-www-form-urlencoded; charset=UTF-8'
},
timeout: 10000
}).then((res) => {
return checkStatus(res)
})
},
get (url, params) {
return axios({
method: 'get',
baseURL: process.env.BASE_URL,
url,
params,
timeout: 10000,
headers: {
'X-Requested-With': 'XMLHttpRequest'
}
}).then(
(response) => {
return checkStatus(response)
}
)
}
}
|
/pages/index.js
1
2
3
4
5
6
7
8
9
10
11
12
13
14
15
16
17
18
19
20
21
22
23
24
| import React,{Component} from 'react';
import http from '../../service/api';
class Index extends Component{
state = {
content : "Index page"
}
render(){
return <div style={{width:"600px", margin:"50% auto"}} dangerouslySetInnerHTML={{__html:this.state.content}}>
</div>
}
componentDidMount(){
http.get("/api/feature.json").then(ent=>{
this.setState(()=>{
return {
content:ent.data
}
})
});
}
}
export default Index;
|
GoToTop
/components/goToTop/index.js
1
2
3
4
5
6
7
8
9
10
11
12
13
| import React,{PureComponent} from 'react';
class GoToTop extends PureComponent{
render(){
return null;
}
componentDidMount(){
window.scrollTo(0,0);
}
}
export default GoToTop;
|
使用方法:直接当组件一样,在需要的页面中进行加载即可。
scrollRestoration
1
2
3
4
5
6
7
8
9
10
11
12
13
14
15
16
17
18
19
20
21
22
23
24
25
26
27
28
| const getWindowScroll = () => {
let supportPageOffset = window.pageXOffset !== undefined;
let isCSS1Compat = ((document.compatMode || "") === "CSS1Compat");
let x = supportPageOffset ? window.pageXOffset : isCSS1Compat ? document.documentElement.scrollLeft : document.body.scrollLeft;
let y = supportPageOffset ? window.pageYOffset : isCSS1Compat ? document.documentElement.scrollTop : document.body.scrollTop;
return {
x,
y
};
}
const getWindowScrollFromSession = (path) => {
let info = sessionStorage.getItem(`scroll-${path}`);
if (!info) return null;
return JSON.parse(info);
}
export const setWindowScrollToSession = (path) => {
let scrollInfo = getWindowScroll();
sessionStorage.setItem(`scroll-${path}`, JSON.stringify(scrollInfo));
}
export const autoWindowScroll = (path) => {
let scrollInfo = getWindowScrollFromSession(path);
if (!scrollInfo) return;
window.scrollTo(scrollInfo.x, scrollInfo.y);
}
|
页面使用:
需要注意的是,这里需要使用setState异步函数形式下的回调函数
1
2
3
4
5
6
7
8
9
10
11
12
| componentDidMount(){
http.get("/api/feature.json").then(ent=>{
this.setState(()=>{
return {
content:ent.data
}
}, ()=>autoWindowScroll(this.props.location.pathname))
});
}
componentWillUnmount(){
setWindowScrollToSession(this.props.location.pathname);
}
|
组件之间的数据传递:
一般情况下,组件之间的数据传递是通过 props 进行,那么如果现在有 OrderItem 被嵌套很深,但该子组件 OrderItem 的一些父组件可能并不会用到 OrderItem 所需要的一些属性,但是因为嵌套了子组件 OrderItem,就不得不对外索要这些子组件所需要的属性,如下:
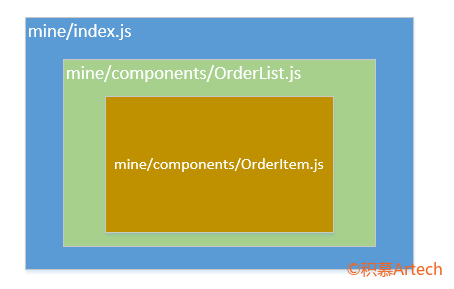
在上图中,假设子组件 OrderItem 需要用到 index.js 中 state 中的某个属性值A,那么这个时候,虽然 OrderList.js 用不到属性值A,但它必须分别对父级提供 props.A 属性,以此来将A属性传递给子组件 OrderItem。
那么有没有什么办法可以简化这个操作?通过:context。
举例:有如下文件结构:
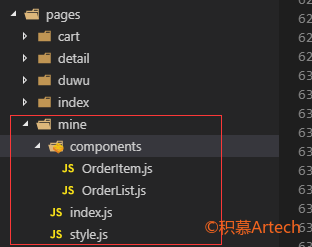
需要通过 index.js 中的按钮来控制 OrderItem.js 中的文本颜色:引用上:index.js 中嵌套 OrderList.js,OrderList.js 中嵌套 OrderItem.js,在正常单项数据流的情况下,虽然最终只是 OrderItem 用到了由 index.js传递的属性(itemColor),但因为 index.js 并非直接引用 OrderItem.js,所以作为中间者的 OrderList.js 不得不对 index.js 提供 props.itemColor,从而再将该值传递给 OrderItem.js 中的 props.itemColor。代码如下:
index.js
1
2
3
4
5
6
7
8
9
10
11
12
13
14
15
16
17
18
19
20
21
22
23
24
25
26
27
28
29
30
| import OrderList from './components/OrderList';
this.state = {
orderList: [
{
title: "博士伦隐形眼镜",
price: 23
},
{
title: "海昌隐形眼镜",
price: 33
},
{
title: "依视路镜片",
price: 43
}
],
currentColor: style.colorRed
}
render() {
return (
<div style={{ height: "600px", margin: "50% auto" }}>
<div>Mine page</div>
<OrderList
orderList={this.state.orderList}
itemColor={this.state.currentColor}>
</OrderList>
<button onClick={() => this.toggleColor()}>toggleColor</button>
</div>);
}
|
orderList.js
1
2
3
4
5
6
7
8
9
10
11
12
13
14
15
| import OrderItem from './OrderItem';
export default (props) => {
return (
<OrderListWrapper>
<OrderTitle>订单信息:</OrderTitle>
{props.orderList.map((item, index) => {
return (<OrderItem
key={index}
item={item}
itemColor={props.itemColor}>
</OrderItem>)
})}
</OrderListWrapper>
)
}
|
orderItem.js
1
2
3
4
5
6
7
| export default (props)=>{
return (
<OrderItem color={props.itemColor}>
{props.item.title}
</OrderItem>
)
}
|
使用 react 的 context 来改写上面的例子:
在src目录下增加context文件夹:
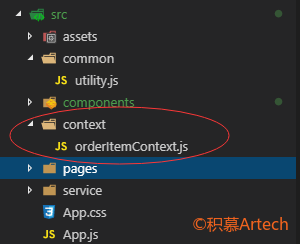
context/orderItemContext.js
1
2
3
4
5
6
7
8
| import React from 'react';
export const style = {
colorRed: "red",
colorBlue: "blue"
}
export default React.createContext(style.colorRed);
|
pages/mine/index.js
1
2
3
4
5
6
7
8
9
10
11
12
13
14
15
16
17
18
19
20
21
22
23
24
25
26
27
28
29
30
31
32
33
34
35
36
37
38
39
40
41
42
43
44
45
46
47
48
49
50
51
52
53
54
| import React, { Component } from 'react'
import OrderList from './components/OrderList';
import OrderItemContext, { style } from '../../context/orderItemContext';
class Mine extends Component {
constructor(props) {
super(props);
this.state = {
orderList: [
{
title: "博士伦隐形眼镜",
price: 23
},
{
title: "海昌隐形眼镜",
price: 33
},
{
title: "依视路镜片",
price: 43
}
],
currentColor: style.colorRed
}
}
render() {
return (
<div style={{ height: "600px", margin: "50% auto" }}>
<div>Mine page</div>
<OrderItemContext.Provider value={this.state.currentColor}>
<OrderList orderList={this.state.orderList} ></OrderList>
</OrderItemContext.Provider>
<button onClick={() => this.toggleColor()}>toggleColor</button>
</div>);
}
toggleColor = () => {
if (this.state.currentColor === style.colorRed) {
this.setState({
currentColor: style.colorBlue
});
} else {
this.setState(() => ({
currentColor: style.colorRed
}));
}
}
}
export default Mine;
|
pages/mine/components/OrderList.js
1
2
3
4
5
6
7
8
9
10
11
12
13
14
15
16
| import React from 'react';
import {
OrderListWrapper,
OrderTitle
} from '../style';
import OrderItem from './OrderItem';
export default (props) => {
return (
<OrderListWrapper>
<OrderTitle>订单信息:</OrderTitle>
{props.orderList.map((item, index) => {
return <OrderItem key={index} item={item} ></OrderItem>
})}
</OrderListWrapper>
)
}
|
pages/mine/components/OrderItem.js
1
2
3
4
5
6
7
8
9
10
11
12
13
14
15
16
17
18
19
20
| import React from 'react';
import OrderItemContext from '../../../context/orderItemContext';
import {
OrderItem
} from '../style';
export default (props) => {
return (
<OrderItemContext.Consumer>
{
importedValue => {
return (
<OrderItem color={importedValue}>
{props.item.title}
</OrderItem>
)
}
}
</OrderItemContext.Consumer>
)
}
|
使用 react-redux 来传递数据
使用步骤:
-
安装
1
2
3
| npm install --save react-redux
同时也需要安装 redux 模块:
npm install --save redux
|
-
在项目根目录下创建store文件夹,并在其内创建reducer.js,index.jS

/store/reducer.js
1
2
3
4
5
6
7
8
9
10
| const defaultState = {
...
}
export default (state = defaultState, action) => {
switch (action.type) {
...
default:
return state;
}
}
|
/store/index.js
1
2
3
4
| import { createStore } from 'redux';
import reducer from './reducer';
const store = createStore(reducer)
export default store;
|
-
在入口文件中引入 Provider组件,作为顶层App的分发点,在相关的页面组件中使用connect进行组件跟redux的store进行连接。
-
/index.js
1
2
3
4
5
6
7
8
9
10
| import { Provider } from 'react-redux';
import store from './store';
const container = (
<Provider store={store}>
<Wrapper>
<App />
</Wrapper>
</Provider>
)
ReactDOM.render(container, document.getElementById('root'));
|
-
components/自定义组件/index.js
1
2
3
4
5
6
7
8
9
| import {connect} from 'react-redux';
...
class Header extends Component {
render() {
...
}
}
...
export default connect(null,null)(Header);
|
例子:使用 react-redux 实现点击按钮时互换上方 title 和 content 的文字颜色:
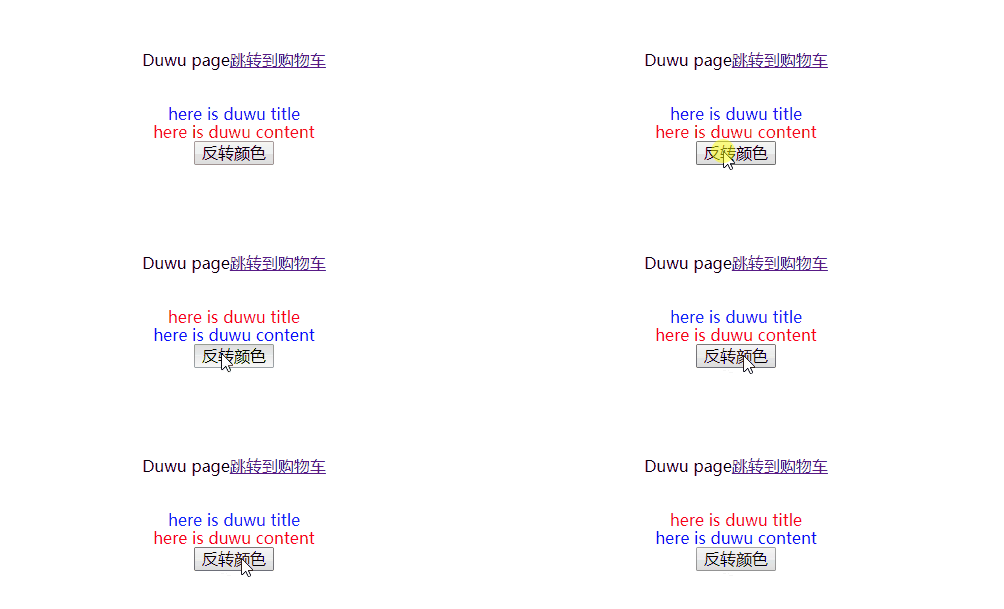
/store/reducer.js
1
2
3
4
5
6
7
8
9
10
11
12
13
14
15
16
17
18
19
20
21
22
23
24
25
26
27
28
29
30
31
32
33
| const defaultState = {
title: {
text: "here is duwu title",
color: "red"
},
content: {
text: "here is duwu content",
color: "blue"
}
}
export default (state = defaultState, action) => {
switch (action.type) {
case "reverseColor":
{
let currentTitle = state.title;
let currentContent = state.content;
return {
title: {
...currentTitle,
color: currentContent.color
},
content: {
...currentContent,
color: currentTitle.color
}
}
}
default:
return state;
}
}
|
/store/index.js
1
2
3
4
5
6
| import { createStore } from 'redux';
import reducer from './reducer';
const store = createStore(reducer)
export default store;
|
/pages/duwu/index.js
1
2
3
4
5
6
7
8
9
10
11
12
13
14
15
16
17
18
19
20
21
22
23
24
25
26
27
28
29
30
31
32
33
34
35
36
37
38
39
| import React, { PureComponent } from 'react'
import { Link } from 'react-router-dom';
import { connect } from 'react-redux';
class Duwu extends PureComponent {
render() {
const { title, content, reverseColor } = this.props;
return (
<div style={{ height: "600px", margin: "50% auto" }}>
Duwu page
<Link to="/cart">跳转到购物车</Link>
<br></br>
<br></br>
<br></br>
<div style={{ color: title.color, }}>{title.text}</div>
<div style={{ color: content.color }}>{content.text}</div>
<button onClick={()=>reverseColor()}>反转颜色</button>
</div>)
}
}
const mapStateToProps = (state) => {
return {
title: state.title,
content: state.content
}
}
const mapDispatchToProps = (dispatch) => {
return {
reverseColor() {
let action = {
type: "reverseColor",
}
dispatch(action);
}
}
}
export default connect(mapStateToProps, mapDispatchToProps)(Duwu);
|
redux
redux 简介:
什么是flux?
flux 工作流:

redux 工作流:
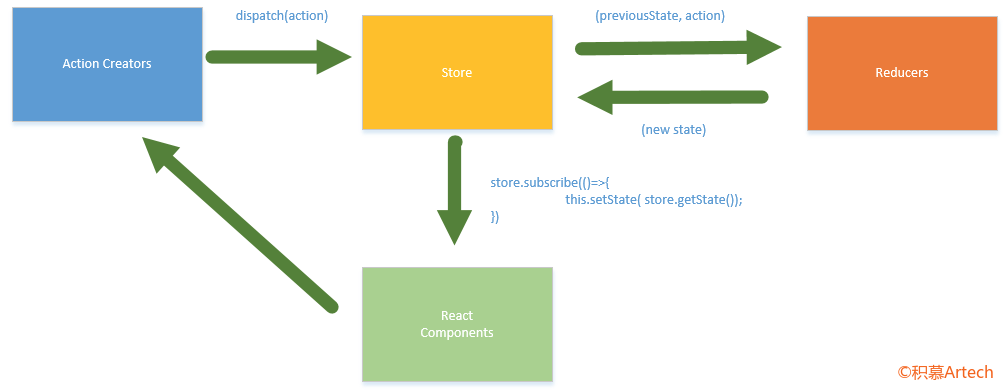
为什么要用 redux?
react 的数据传递是单向的:
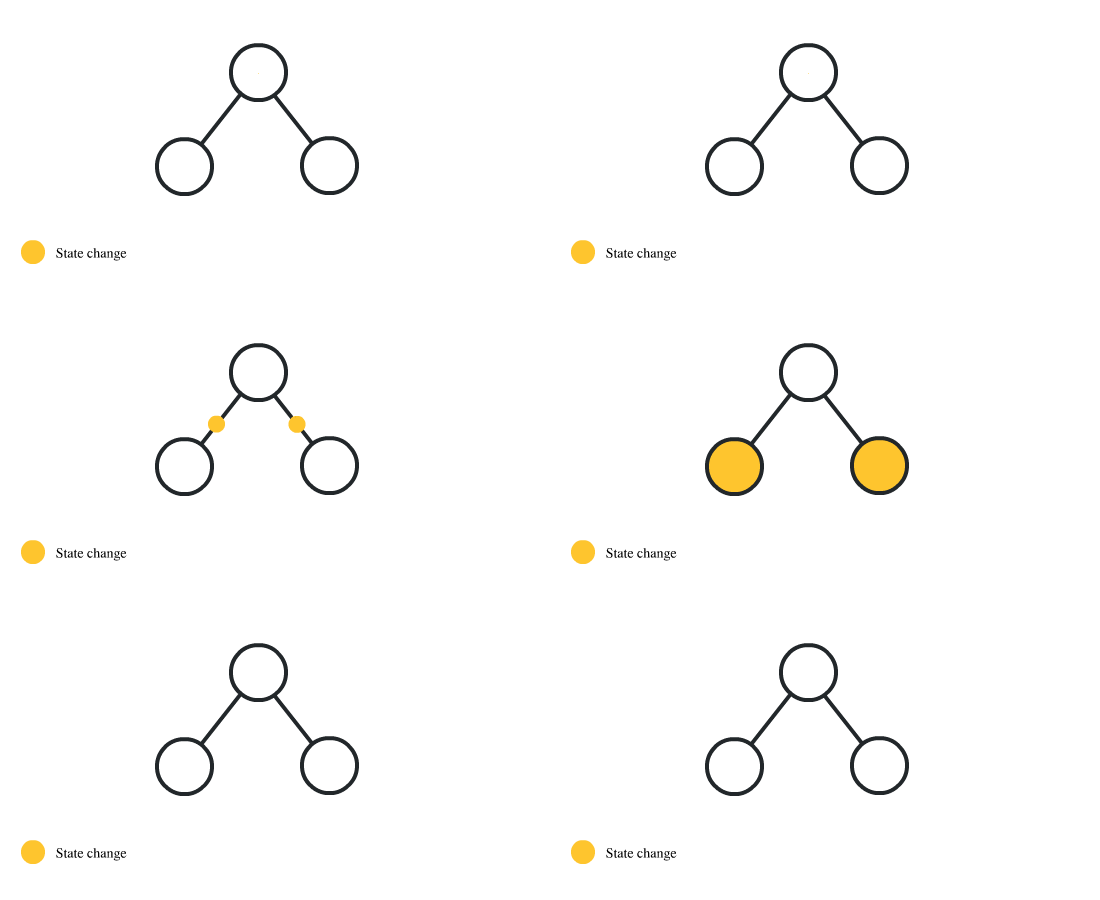
通过props属性进行数据的传递
非父子组件之间共享 state
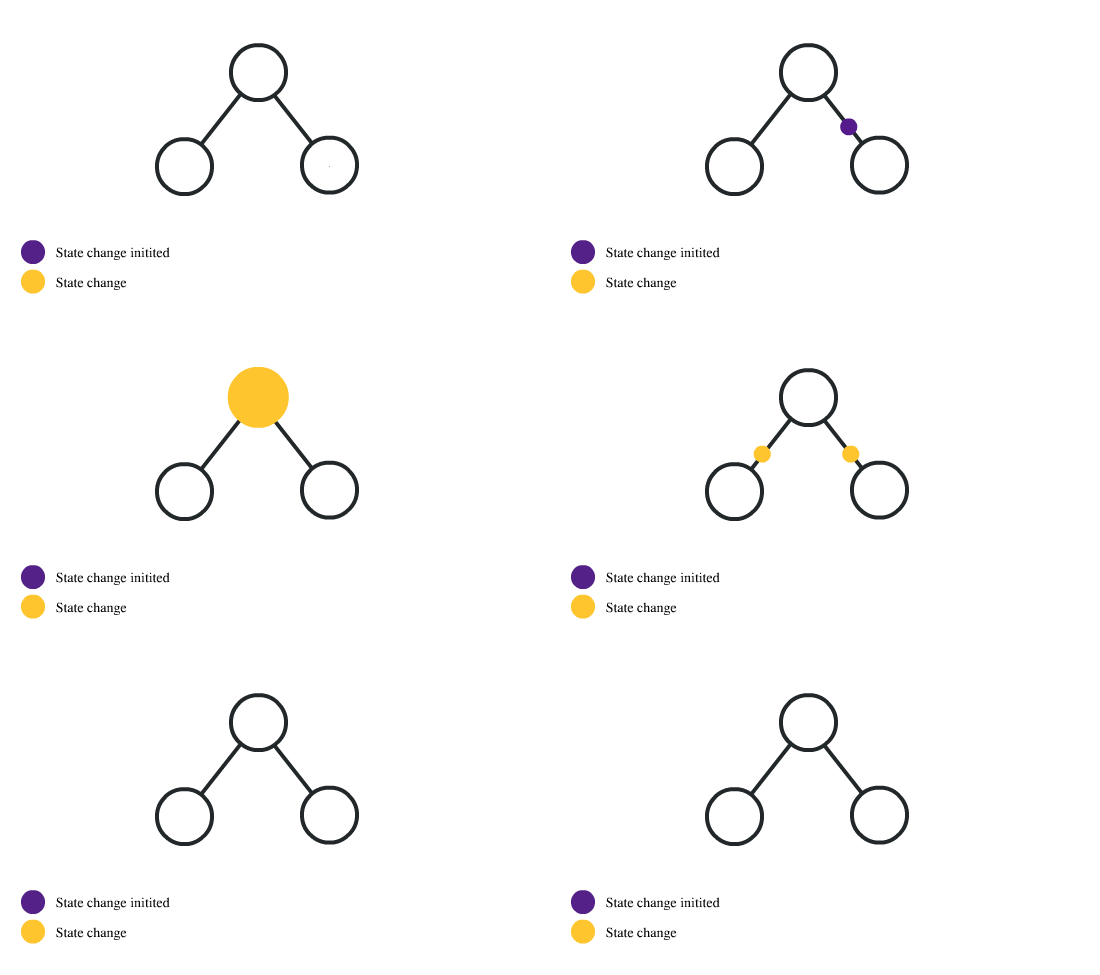
使用redux之后:数据传递不再是单向、线性的,所有组件的数据都会放到 store 中,直接下放到对应需要更新的组件中。
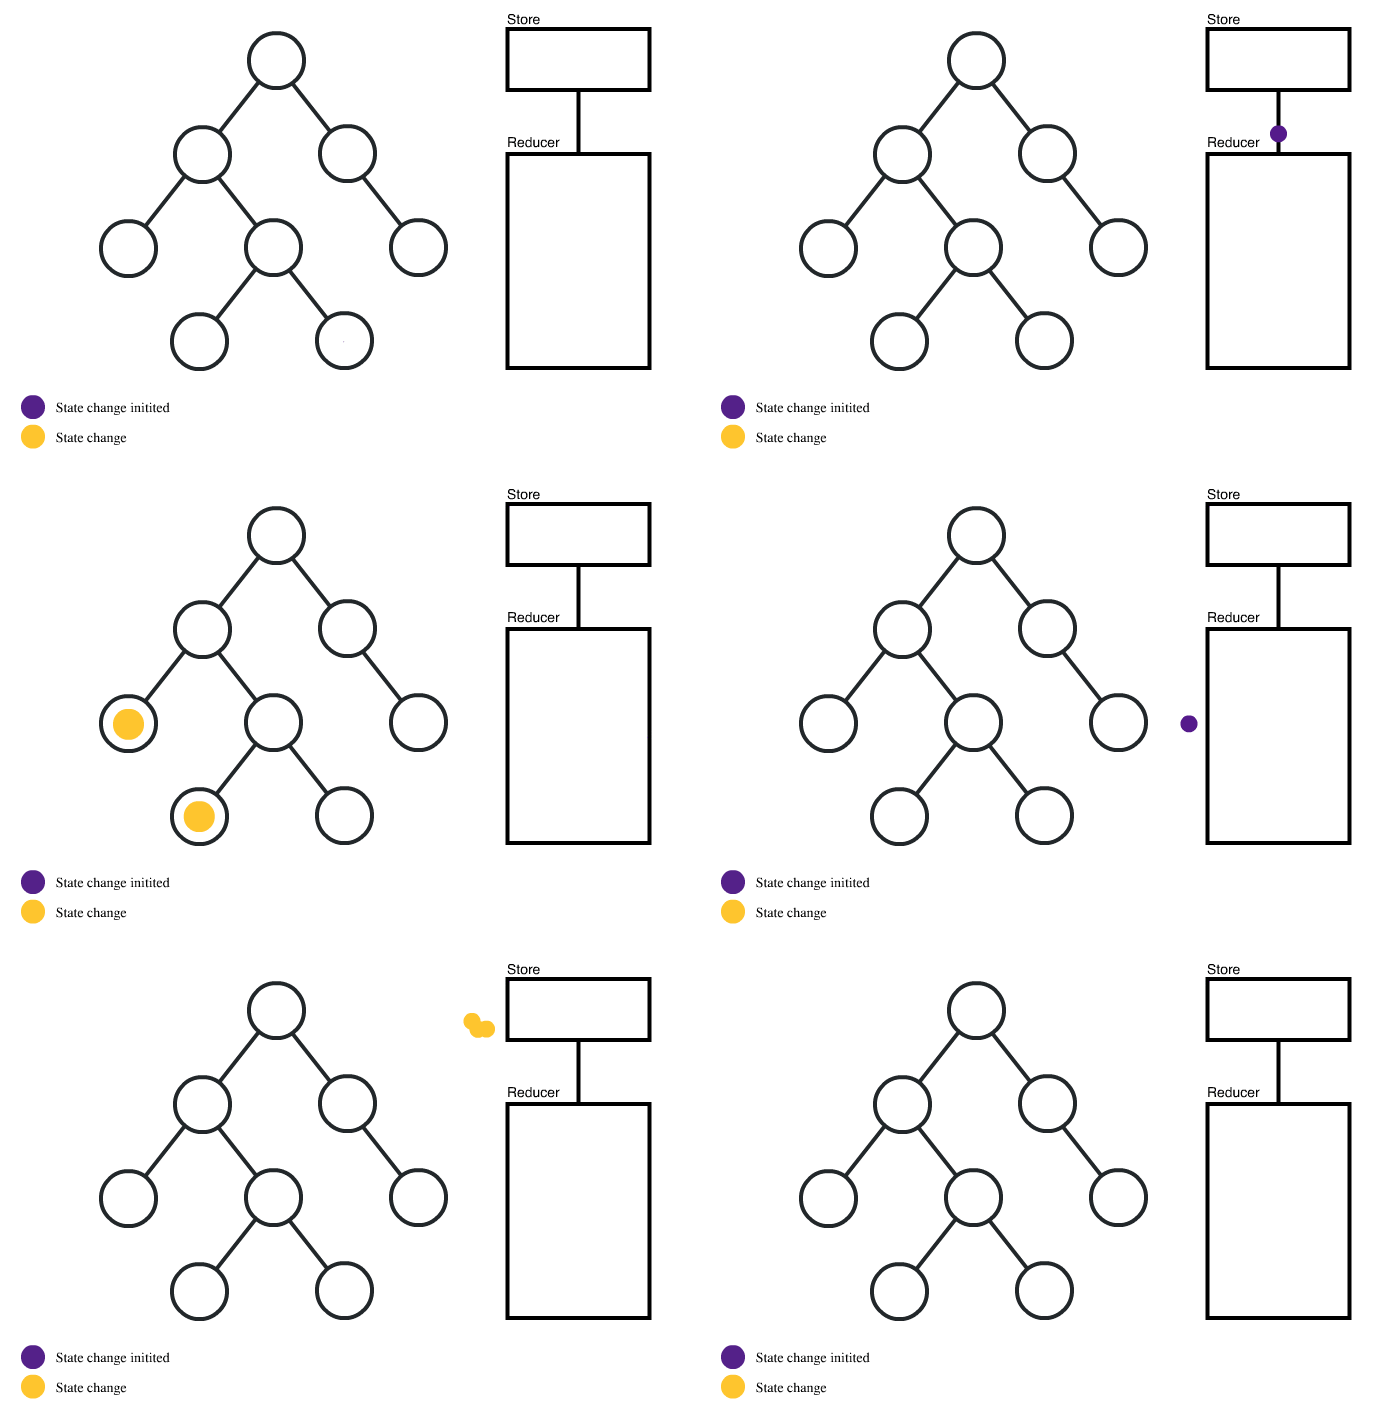
使用 react-redux 来简化
项目地址:https://github.com/reduxjs/react-redux
react-redux 是一个模块(或者说是一个库:一个将 redux 模式跟 react.js相结合的一个库)(也可以认为是 redux 在 react.js 中的体现)
如何进一步优化使用:react-redux
将抽离 action.types,将 action 的生成放到一个独立的文件中,进一步从页面中剥离出业务。
-
在 /store 文件夹中新增 actionTypes.js,actionCreators.js
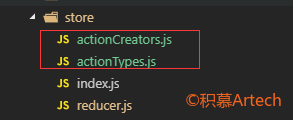
actionTypes.js
1
| export const REVERSE_COLOR = "DUWU/REVERSE_COLOR"
|
actionCreators.js
1
2
3
4
5
6
| import { REVERSE_COLOR } from './actionTypes';
export const GetReverseColorAction = ()=>{
return {
type:REVERSE_COLOR
}
}
|
-
调整原 reducer.js 和 /pages/duwu/index.js代码
/store/reducer.js
1
2
3
4
5
6
7
8
9
10
11
12
13
14
15
16
17
18
19
20
21
22
23
24
25
26
27
28
29
30
31
32
| import {REVERSE_COLOR} from './actionTypes';
const defaultState = {
title: {
text: "here is duwu title",
color: "red"
},
content: {
text: "here is duwu content",
color: "blue"
}
}
export default (state = defaultState, action) => {
switch (action.type) {
case REVERSE_COLOR:
{
let currentTitle = state.title;
let currentContent = state.content;
return {
title: {
...currentTitle,
color: currentContent.color
},
content: {
...currentContent,
color: currentTitle.color
}
}
}
default:
return state;
}
}
|
/pages/duwu/index.js
1
2
3
4
5
6
7
8
9
10
11
12
13
14
15
16
17
18
19
20
21
22
23
24
25
26
27
28
29
| import React, { PureComponent } from 'react'
import { setWindowScrollToSession, autoWindowScroll } from '../../common/utility';
import { connect } from 'react-redux';
import { InitIndex } from './store/actionCreators';
class Index extends PureComponent {
render() {
return <div dangerouslySetInnerHTML={{ __html: this.props.content }}></div>
}
componentDidMount() {
this.props.initPage(this.props.location.pathname);
}
componentWillUnmount() {
setWindowScrollToSession(this.props.location.pathname);
}
}
const mapStateToProps = (state) => {
return {
content: state.getIn(["index", "content"])
}
}
const mapDispatchToProps = (dispatch) => {
return {
initPage(pathname) {
dispatch(InitIndex());
autoWindowScroll(pathname);
}
}
}
export default connect(mapStateToProps, mapDispatchToProps)(Index);
|
immutable.js
为什么要用 immutable.js?
使用 immutable
安装:
在 reducer.js 中引入 immutable,将原先的 state 对象转换为 immutable 类型
1
2
3
4
5
6
7
8
9
10
11
12
13
14
15
16
17
18
19
20
21
22
23
24
25
26
27
28
29
30
31
32
33
34
35
36
37
38
39
40
41
42
43
44
45
46
47
48
49
50
51
52
53
54
55
56
57
58
| import { REVERSE_COLOR } from './actionTypes';
import { fromJS } from 'immutable';
const defaultState = fromJS({
title: {
text: "here is duwu title",
color: "red"
},
content: {
text: "here is duwu content",
color: "blue"
}
})
export default (state = defaultState, action) => {
switch (action.type) {
case REVERSE_COLOR:
{
let currentTitleColor = state.getIn(["title","color"]);
let currentContentColor = state.getIn(["content","color"]);
return state
.setIn(["title","color"],currentContentColor)
.setIn(["content","color"],currentTitleColor)
}
default:
return state;
}
}
|
调整使用的地方:/pages/duwu/index.js
1
2
3
4
5
6
7
| const mapStateToProps = (state) => {
return {
title: state.get("title").toJS(),
content: state.get("content").toJS()
}
}
|
更多关于immutable.js:https://github.com/facebook/immutable-js
进一步抽离 store 文件夹到每一个独立的 pages 页面中
调整项目结构
-
在 /pages/duwu 文件夹中新建 store 文件夹
-
将原 /store 目录下的 actionCreators.js,actionTypes.js 移动至 /pages/duwu/store中
-
将原 /store 目录下的 reducer.js 复制一份到 /pages/duwu/store 中
-
在 /pages/duwu/store 中新建一个 index.js
调整后的最终目录结构为:
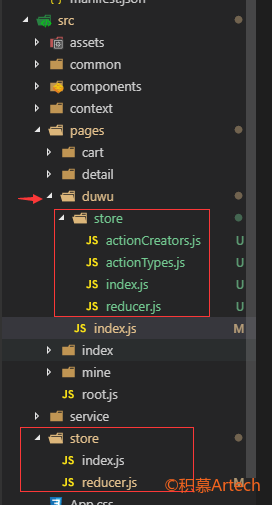
其中:
1
2
3
4
5
| import reducer from './reducer';
import * as actionCreators from './actionCreators';
import * as actionTypes from './actionTypes';
export { reducer, actionCreators, actionTypes};
|
1
2
3
4
5
| import { combineReducers } from 'redux';
import { reducer as duwuReducer } from '../pages/duwu/store';
export default combineReducers({
duwu: duwuReducer
});
|
1
2
3
4
5
6
7
8
9
10
11
|
const mapStateToProps = (state) => {
return {
title: state.duwu.get("title").toJS(),
content: state.duwu.get("content").toJS()
}
}
|
统一格式,让在页面中使用 state.duwu 也是一个 immutable对象
1
| npm install redux-immutable
|
1
2
3
4
5
| import { combineReducers } from 'redux-immutable';
import { reducer as duwuReducer } from '../pages/duwu/store';
export default combineReducers({
duwu: duwuReducer
});
|
1
2
3
4
5
6
7
8
9
| const mapStateToProps = (state) => {
return {
title: state.getIn(["duwu","title"]).toJS(),
content: state.getIn(["duwu","content"]).toJS()
}
}
|
使用 redux-thunk:进一步从页面中抽离业务方法
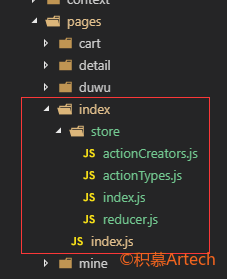
使用 /pages/index 页面来做演示
- 默认情况下, 在 actionCreators,只能够返回对象,而不能返回方法( dispatch 的入参至支持对象)
- 但引入 redux-thunk 之后,dispatch 的入参就可以是一个方法。
- 何为 redux-thunk ?
- 它是 redux 的一个中间件,用以支持 dispatch 的参数是一个方法。
使用 redux-thunk 改写 index 页
1
| npm install --save redux-thunk
|
1
2
3
4
5
6
| import { createStore,applyMiddleware } from 'redux';
import reducer from './reducer';
import thunk from 'redux-thunk';
const store = createStore(reducer,applyMiddleware(thunk))
export default store;
|
1
2
3
4
5
6
7
8
9
10
11
12
13
14
15
16
17
18
19
20
21
22
23
24
25
26
27
28
29
| import React, { PureComponent } from 'react'
import { setWindowScrollToSession, autoWindowScroll } from '../../common/utility';
import { connect } from 'react-redux';
import { InitIndex } from './store/actionCreators';
class Index extends PureComponent {
render() {
return <div dangerouslySetInnerHTML={{ __html: this.props.content }}></div>
}
componentDidMount() {
this.props.initPage(this.props.location.pathname);
}
componentWillUnmount() {
setWindowScrollToSession(this.props.location.pathname);
}
}
const mapStateToProps = (state) => {
return {
content: state.getIn(["index", "content"])
}
}
const mapDispatchToProps = (dispatch) => {
return {
initPage(pathname) {
dispatch(InitIndex());
autoWindowScroll(pathname);
}
}
}
export default connect(mapStateToProps, mapDispatchToProps)(Index);
|
1
2
3
4
5
6
7
8
9
10
11
12
13
14
15
16
| import { GET_INDEX_TEMPLATE } from './actionTypes';
import http from '../../../service/api';
const GetInitIndexAction = (content) => {
return {
type: GET_INDEX_TEMPLATE,
data: content
};
}
export const InitIndex = () => {
return (dispatch) => {
http.get("/api/feature.json").then((result) => {
let action = GetInitIndexAction(result.data);
dispatch(action);
});
}
}
|
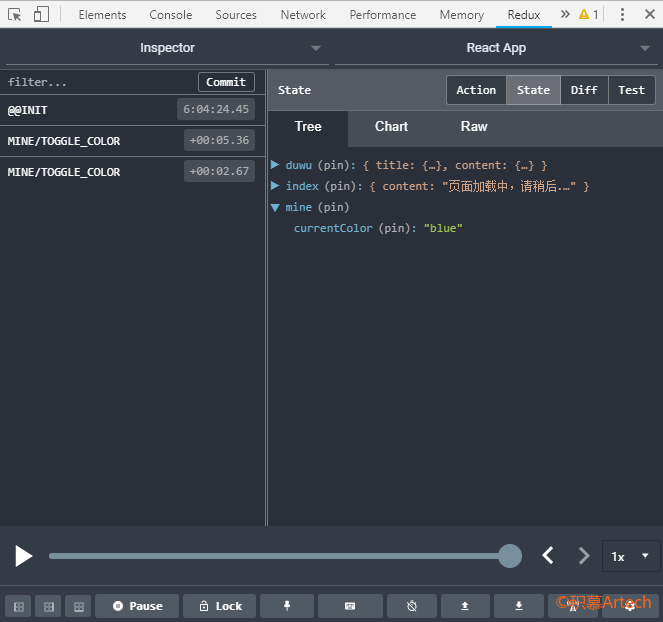
chrome插件:redux的安装和配置及使用
在 /store/index.js 中增加对 redux-devtools 的支持
参考: https://github.com/zalmoxisus/redux-devtools-extension#usage
在使用了中间件的情况下,使用以下代码:
1
2
3
4
5
6
7
8
9
10
11
12
| const composeEnhancers =
typeof window === 'object' &&
window.__REDUX_DEVTOOLS_EXTENSION_COMPOSE__ ?
window.__REDUX_DEVTOOLS_EXTENSION_COMPOSE__({
}) : compose;
const enhancer = composeEnhancers(
applyMiddleware(...middleware),
);
const store = createStore(reducer, enhancer);
|
最终调整后的 /store/index.js 的代码为:
1
2
3
4
5
6
7
8
9
10
11
12
13
14
15
16
17
| import { createStore,applyMiddleware,compose } from 'redux';
import reducer from './reducer';
import thunk from 'redux-thunk';
const composeEnhancers =
typeof window === 'object' &&
window.__REDUX_DEVTOOLS_EXTENSION_COMPOSE__ ?
window.__REDUX_DEVTOOLS_EXTENSION_COMPOSE__({
}) : compose;
const enhancer = composeEnhancers(
applyMiddleware(thunk),
);
const store = createStore(reducer,enhancer)
export default store;
|
加入支持前:

加入支持后:
2018-11-16 培训内容:使用公司内部 npm ,ui 组件化培训
概述:
如何制作包?
通过使用 create-react-library 创建组件库
create-react-library项目地址:create-react-library in github
-
安装:create-react-library
1
| npm install -g create-react-library
|
-
通过 create-react-library 创建组件 lib
-
之后根据问答式提示进行创建包文件,如:
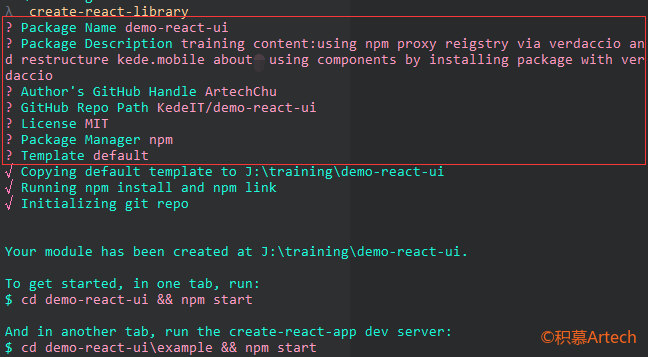
tips:安装模板的时候会从 npm 源下载一些文件,建议先将 npm 的 registry 切到国内,如淘宝源等。
生成后目录结构:
/
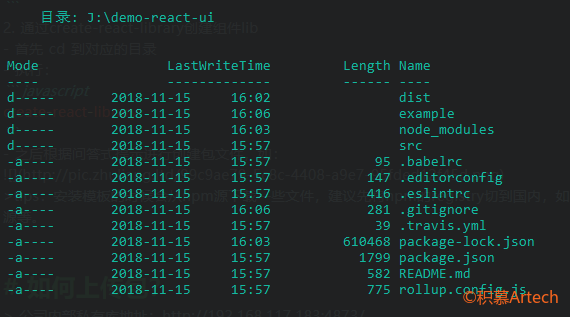
其中:

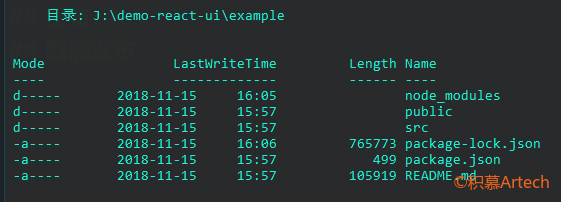
添加ui组件源码
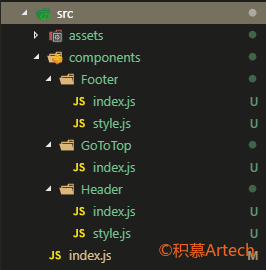
将 kede.mobile 项目中的 assets,components 文件夹及其中的内容复制到 src 文件夹内,如:
1
2
3
4
5
6
|
import Header from './Header';
import Footer from './Footer';
import GoToTop from './GoToTop';
export { Header, Footer, GoToTop };
|
安装必要的模块
本次需要安装的模块有: styled-components、react-router-dom
1
2
|
npm install -D styled-components react-router-dom
|
1
2
3
4
5
6
7
8
9
10
11
12
13
14
15
|
"peerDependencies": {
"styled-components": "^4.1.1",
"react-router-dom": "^4.3.1"
},
"devDependencies": {
"styled-components": "^4.1.1",
"react-router-dom": "^4.3.1"
}
|
发布前的测试
调整 /example 中的项目,以可以显示安装的 ui 组件,对于本次培训,直接调整 /example/src/index.js 即可:
1
2
3
4
5
6
7
8
9
10
11
12
13
14
|
import React, { Fragment } from 'react'
import ReactDOM from 'react-dom'
import { BrowserRouter } from 'react-router-dom';
import './index.css'
import App from './App'
const container = (
<Fragment>
<BrowserRouter>
<App />
</BrowserRouter>
</Fragment>
)
ReactDOM.render(container, document.getElementById('root'))
|
1
2
3
4
5
6
7
8
9
10
|
npm start
cd example
npm start
|
如何上传包?
公司内部私有库地址:http://192.168.117.183:4873/
基于 verdaccio:一个轻量级的私有代理 npm 库
通过添加一个 registry
不强制,只是个人习惯而已,大家有其他好的方法的,记得分享 :)
1
2
3
4
5
6
7
| nrm add kede http:
测试:
nrm test kede
将npm的当前registry切换至kede
nrm use kede
|
P.S.: 目前,在 verdaccio 配置中,uplink已经设置为 taobao 源,但测试下来,虽然已经设置了上游信息,在安装非内部包的时候依然会出现一些莫名错误。建议:在安装非内部pakcage的时候,切换到 taobao 源进行安装。
以下步骤均在 kede 源下进行:$nrm use kede
注册:
登陆:
发布:
取消发布:
1
| npm unpublish <package_name>@<version_no>
|
在 kede.mobile 中使用该 package
安装 demo-react-ui:
1
2
| nrm use kede
npm install --save demo-react-ui
|
删除项目中的 components 文件夹
调整引用:
1
2
3
4
5
|
import {Header, Footer} from 'demo-react-ui';
|
1
2
3
4
|
import {GoToTop} from 'demo-react-ui';
|


